Website speed is crucial for several reasons. Firstly, it directly impacts user experience. Slow-loading sites frustrate visitors, leading to higher bounce rates and reduced engagement. Fast-loading pages enhance user satisfaction and encourage longer stays, boosting conversions and revenue.
Secondly, search engines consider speed when ranking websites. Faster sites often receive higher search engine rankings, leading to increased organic traffic. Moreover, improved loading times positively affect mobile users, as mobile devices typically have limited processing power and slower connections.
Additionally, website speed influences accessibility. Slow sites may deter people with disabilities who rely on assistive technologies. It also affects e-commerce; faster checkouts enhance the customer journey, reducing cart abandonment.
Lastly, in today’s fast-paced digital landscape, users expect rapid information retrieval. A slow site can undermine a company’s credibility and reputation. Therefore, investing in optimizing website speed is a strategic move to ensure better user experiences, higher search rankings, and overall business success.
Basic setting of Litespeed Caches Plugin.
To install the LiteSpeed Cache plugin in WordPress, follow these steps:
- Log in to Your WordPress Dashboard: Access the backend of your WordPress site by entering your login credentials.
- Navigate to Plugins: In the dashboard menu, click on “Plugins” and select “Add New.”
- Search for LiteSpeed Cache: In the search bar, type “LiteSpeed Cache” and hit “Enter.”
- Install the Plugin: Locate the LiteSpeed Cache plugin from the search results and click on the “Install Now” button.
- Activate the Plugin: After installation, click the “Activate” button to enable the LiteSpeed Cache plugin on your WordPress site.
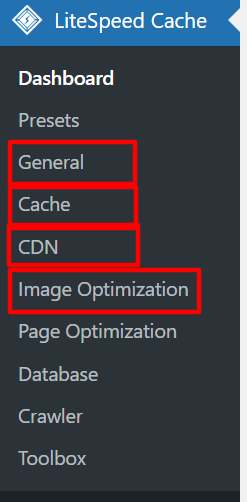
- Access Plugin Settings: A new “LiteSpeed Cache” option will appear in your dashboard menu. Click on it to access the plugin’s settings.
- Configure Settings: Customize the caching settings according to your site’s needs. LiteSpeed Cache offers various optimization options, including page cache, browser cache, and more.
- Save Changes: Don’t forget to save your configuration changes after adjusting the settings.
- Test Your Site: Check your site’s performance and loading times to ensure the plugin is working effectively.
By following these steps, you can easily install and configure the LiteSpeed Cache plugin to enhance your WordPress site’s speed and performance.
Lets Start Configuration of litespeed Plugin
Get ready to supercharge your website’s speed and performance with the LiteSpeed Cache plugin! In this guide, we’ll walk you through the process of setting up the plugin for optimal results. Say goodbye to slow-loading pages and hello to a faster, smoother online experience for your visitors. Let’s dive in and start configuring the LiteSpeed plugin!
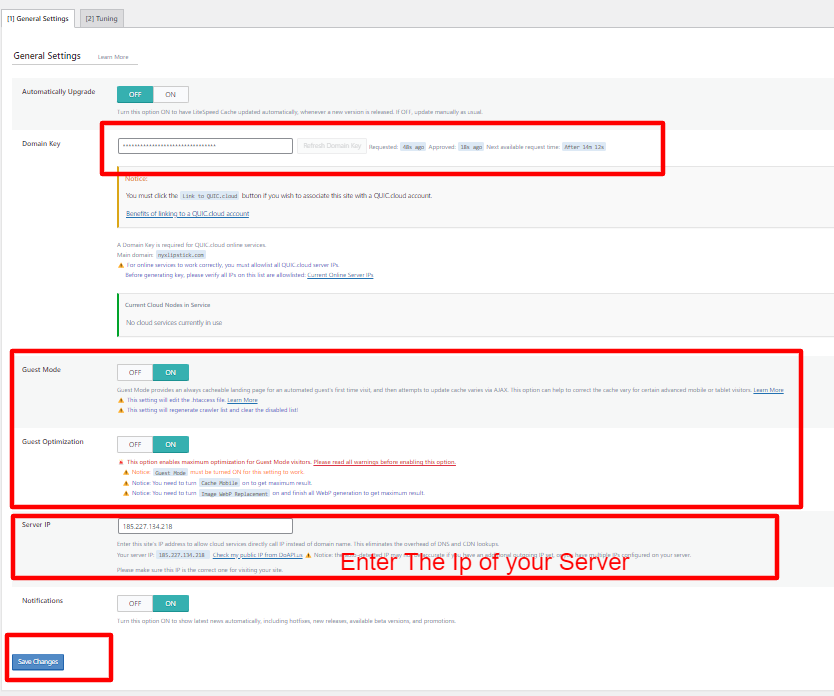
Step 1: General Setting
Embarking on the journey to enhance your website’s performance begins with simple yet effective steps. Follow the visual guide provided to navigate through the general settings configuration process. Your task is to focus on the specific options indicated in the image. By doing so, you’ll ensure that your website is optimized for speed and efficiency while maintaining the integrity of the other settings.
This approach empowers you to make targeted adjustments that align with your optimization goals. With these changes, you’ll be on your way to achieving a website that not only loads faster but also provides an exceptional user experience. So, roll up your sleeves and let’s delve into the realm of configuration, making strategic alterations to usher in a new era of improved website performance.
Step 2: Caches
The caching settings within the LiteSpeed plugin are organized into three distinct steps, each catering to a specific aspect of optimization: Caches, Objective Caches, and Browser Caches. These steps collectively form a comprehensive approach to enhancing your website’s speed and performance.
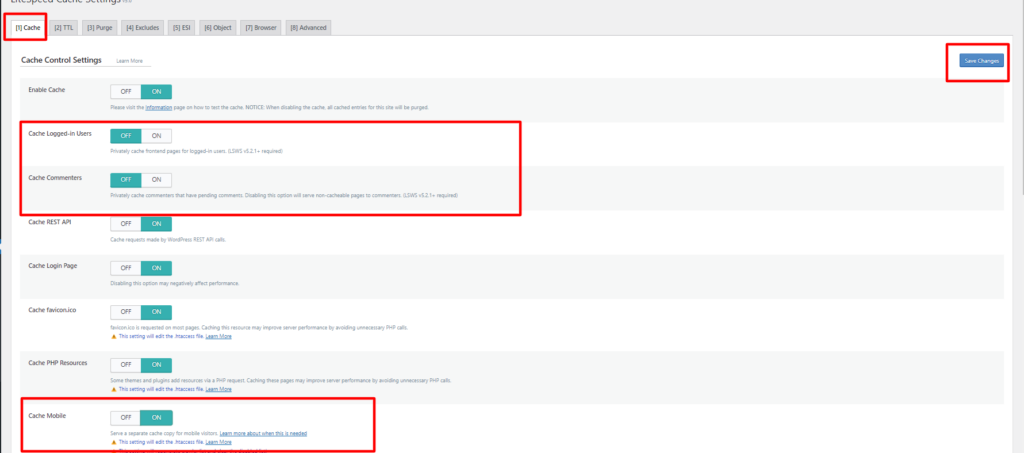
In the ‘Caches’ section, you’ll find a range of options designed to intelligently store and deliver frequently accessed content, reducing the time it takes for pages to load.

The ‘Objective Caches’ step focuses on optimizing various elements, such as databases and objects, further streamlining the way your site functions.
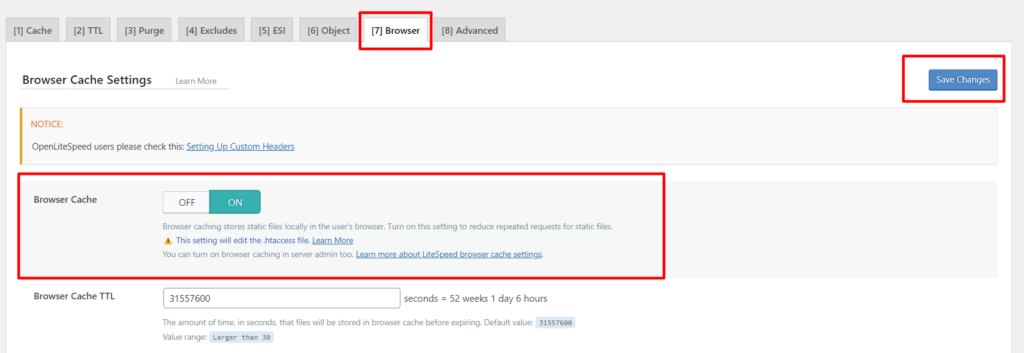
Finally, the ‘Browser Caches’ section tackles visitor-side improvements, allowing for elements like images and stylesheets to be stored in a user’s browser for quicker future visits.
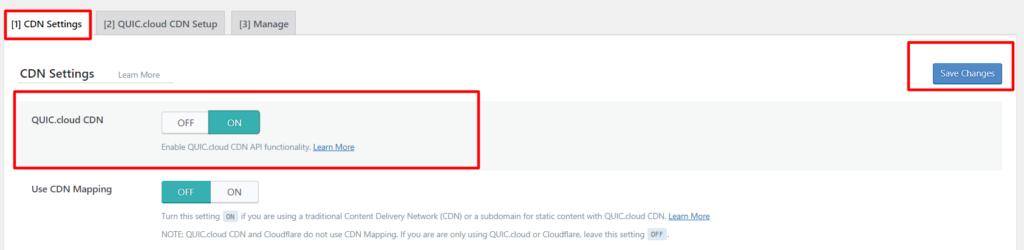
Step 3: CDN
Achieving optimal website speed can be as easy as a single step – turning on the QUIC.cloud Content Delivery Network (CDN). However, for those who strive for an even higher level of performance, there’s an opportunity to take it a step further. By seamlessly connecting both the QUIC.cloud CDN and Cloudflare, you unlock a synergy that can propel your website’s speed and efficiency to unprecedented heights.
The magic lies in the collaboration of these two powerful systems. QUIC.cloud CDN works its wonders by strategically distributing your website’s content across a network of servers, ensuring that visitors receive data from the closest possible source, thus reducing loading times. When integrated with Cloudflare, renowned for its global network and security features, you create a dynamic duo that optimizes not only speed but also enhances security and resilience against potential threats.
Incorporating both QUIC.cloud CDN and Cloudflare is like adding an afterburner to your website’s engine. The result? A turbocharged browsing experience that leaves your visitors impressed and engaged. So, while one step can make a remarkable difference, taking two steps forward can lead to a digital journey that’s both lightning-fast and highly secure.
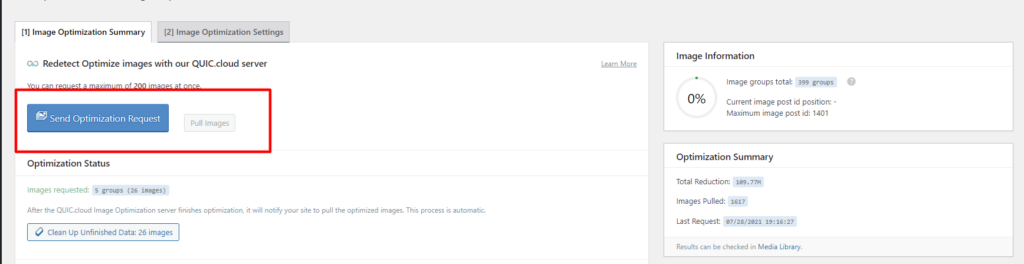
Setp 4 : Image Optimization Settings
Certainly, while I can’t directly view or display images, I can certainly guide you through some image optimization settings that are commonly found in optimization plugins. Here’s a general description of a few image optimization settings you might encounter:
- Image Compression Level: Adjust the compression level for images. Higher compression reduces file size but might slightly affect image quality.
- Resize Images: Set a maximum width and height for images. Larger images are automatically resized to these dimensions, improving loading times.
- Convert to WebP Format: Enable conversion of images to the WebP format, which provides high compression with minimal quality loss, supported by modern browsers.
- Lazy Loading: Enable lazy loading for images. Images load as users scroll down the page, reducing initial load times.
- Enable Browser Caching: Allow browsers to store images temporarily, so returning visitors don’t need to download them again.
- Optimize Thumbnails: Apply optimization to thumbnail images as well, ensuring consistent loading speed across various image sizes.
- Exclude Certain Images: Specify images that should be excluded from optimization. Useful for preserving specific images from the optimization process.
- Backup Original Images: Automatically create backups of original images before optimization, ensuring you have a copy of the unaltered files.
- Automatic Optimization: Enable automatic optimization for new images uploaded to your website, ensuring ongoing optimization without manual intervention.
- Lossless vs. Lossy Compression: Choose between lossless (minimal quality loss) and lossy (higher compression with some quality loss) image compression options.
- Scheduled Optimization: Schedule automatic image optimization during off-peak hours to reduce the impact on your server during high-traffic times.

Remember that the ideal settings may vary depending on your website’s specific needs, design, and the types of images you use. It’s recommended to test different settings and monitor their impact on loading times and image quality to find the right balance. Always keep a backup of your original images before applying optimizations.
Finally Website Speed Optimization Done
In the realm of website performance, sometimes it’s the simplest changes that yield the most remarkable results. Welcome to the world of basic optimization, where a few strategic steps can work wonders for your website’s speed and user experience. By following these fundamental guidelines, you’re poised to witness a notable improvement in how swiftly your web pages load and how smoothly they function.
Within this guide, we’ve distilled these crucial optimization steps that promise to be game-changers for your online presence. From fine-tuning image sizes and minimizing code to leveraging browser caching and enabling compression, these actions hold the key to unlocking a faster, more efficient website. Embrace these practices, and you’ll be astounded by the impact on your site’s responsiveness.
So, if you’re ready to make a significant stride towards a speedier website, join us on this journey of basic optimization. Implement these steps, and witness firsthand the transformation in your website’s performance. It’s not just a recommendation; it’s a pathway to a better digital experience.